Table of Contents
Oyster mushrooms are an excellent starting place for anyone who's never tried to grow mushrooms in the past, or who's tried and failed. They're one of the easiest and most forgiving types of mushrooms to grow.
Using straw as a growing medium is an easy way to get a high yield for both veteran and novice growers alike.

Things You'll Need
Straw
Mushroom grain spawn
Large pot and stove
Candy thermometer (ideal)
Plastic bags
Spray bottle
Planting Your Oyster Mushrooms

Oat straw
A. Prepare Your Straw.
Before you can start to germinate your mushroom spawn, you have to prepare the straw you will use. While you can use several straw varieties to grow your Oyster mushrooms, oat or wheat straw seem to work best.
When you get your bale of straw, chop it up into one to three-inch pieces.
B. Pasteurize Your Straw.
Once you've cut your straw up into smaller pieces, it's time to pasteurize it to get it ready for your Oyster mushroom spores. By heating your straw, you'll kill off bacteria or mold that would compete with your mushrooms during the growing process. If you have smaller amounts of straw, you can use a large pot and hot water to pasteurize it on the stove.
Start the pasteurization process by loading your pot with straw and pouring water on it until the water completely covers the straw.
Heat your water and straw on the stove until you reach a temperature of at 149 degrees Fahrenheit to kill off any bacteria. You can use a candy thermometer to keep track of your water temperature, and it should stay between 149 degrees and 165 degrees for two hours.
Once your straw has pasteurized for two hours, drain the water and let your straw cool down completely. If you're in a hurry, you can spread your straw out on a dry surface to cool quicker. You don't want to recontaminate your straw, so wash the area first before you lay your straw out.
C. Introduce Your Oyster Mushroom Spawn to the Straw.
When your straw is completely cool, introduce your spawn into the straw. By using a higher spawn-to-straw ratio, you're increasing your chances of a good crop.
Your ratio should be higher than 10 percent as this decreases the chance of contamination.
If you choose to do a 15 percent ratio and you have 20 pounds of wet straw, you'd want at least three pounds of spawn.
D. Mix Your Spawn Into Your Straw.
Mix your spawn into your straw using the pot you pasteurized your straw in or the table where you laid it out to dry, .
Try to get as even of a distribution as you can, and make sure that no hot spots are remaining in the straw. It's a good idea to wash your hands before you start as well to reduce the chance that you'll contaminate the straw.
E. Add Your Mixture into Your Plastic Bags.
Once you've distributed your spawn throughout your straw, stuff it into your plastic bags. You want to pack these bags tightly with your mixture.
Tie off your bags and punch holes into your bags every three inches or so. This will allow for enough airflow for your mushrooms to cultivate, and it'll give them holes to grow out of. Your plastic will act like tree bark and protect your Oyster mushrooms while the holes will act like cracks that allow airflow which encourages your mushrooms to spore.
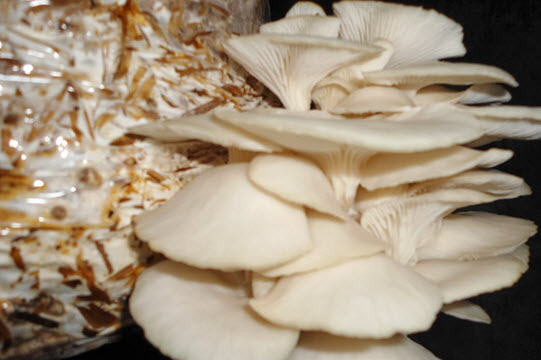
Growing Your Oyster Mushrooms

Oyster mushrooms growing out of bags of straw
Now all of your hard work is finished, and you'll have to find a home for your mushrooms to colonize and fruit. Here's what you'll be doing next:
Place your bags out of the direct sunlight and keep them around 60 to 65 degrees Fahrenheit. You could also try room temperature if you can't find a space around that temperature, but they usually do better between 60 to 65 degrees.
Watch out for a nice white growth of mycelium that takes over your entire bag. If you see patches of green mold, it most likely contaminated and it won't grow. Mycelium looks like white, furry cobwebs, and you should see it starting to develop and take over within two to three weeks.
Spritz your straw with water until it's slightly damp anytime you notice it drying out. During this time, you want your straw to stay moist but not dripping wet so be careful not to overdo it.
Once your Mycelium has taken over, your mushrooms should start forming. Depending on the size of your bags, this could take up to five weeks or longer. The first things you'll see are pins or the adolescent mushrooms, and they can grow fast. As your mushrooms are growing, spritz them with water if you notice that they're getting dry because you want to keep them damp to ensure optimal growth.
Harvesting Your Oyster Mushrooms
The caps should be flat and only starting to curl up. Don't wait that they're too concave and all curving upwards.
You'll know when it's time to harvest your mushrooms because the caps will start to curl upwards. This means your mushrooms are about to spore, and they're ready for you to harvest them. If your mushrooms have a fine powder on them, they've already spored. This is okay, and they're still safe, but some people do develop allergies to the spores.
Remove your mushroom cluster from the base with a knife or twist it off with your hand. You can expect to get around five pounds of mushrooms for every 20 pounds of straw. If you keep the area damp, you should be able to get three or four crops of mushrooms off of each bag.
Common Problems with Growing Mushrooms
Contamination - It's very easy to lose an entire harvest because it was contaminated.
Humidity - A humid environment invites bacteria to grow, and the bacteria can push out your mushroom crop.
Not Enough Moisture - Your mushrooms need moisture to grow and thrive. Without it, the Mycelium won't take over and give your mushrooms a solid base to grow from.
Not Enough Air - If you don't punch holes in the bag and allow some airflow, you'll end up with stunted mushrooms.
Oyster Mushroom Trivia

Photo from Catherine Bukowski Flickr
Oyster mushrooms have a unique, sweet scent that smells like licorice.
The Oyster mushroom's name in Latin means 'sideways oyster' in reference to its shape.
Oyster mushroom's mycelia will kill and eat roundworms, and this makes it one of the few carnivorous mushroom species.
Over 3,000 years ago mushrooms were favored as a "food of the Gods," and ancient Pharaohs considered them a delicacy.
Watch These Videos
If you're a beginner and want to try it at home, Paul's beginner tutorial is very easy to follow. All you need is a brown paper bag, straw, or other woody material.
And once you already have mushrooms growing on your straw block, watch what you can expect next.
Read More Beginner Gardening Tips