Table of Contents
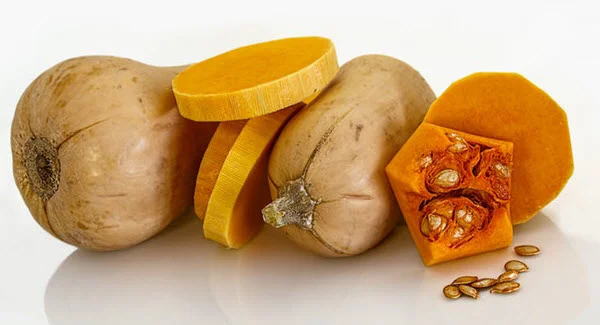
Butternut Squash is a relatively easy vegetable to cultivate, and you get a high yield from these plants.
However, they do need a lot of space to grow, and a single plant can have vines that stretch up to fifteen feet, so keep that in mind if you have limited space.
They're chock full of nutrients, antioxidants, and vitamins so they make a great addition to your vegetable garden.
You do need a little extra care at the beginning, so we're going to take you through a step by step guide on how to grow butternut squash.
Things You'll Need

Butternut Squash seeds
Fertilizer
Potting soil
Peat pots
Wooden spoon
Shovel and/or a roto-tiller
Planting
These plants are very sensitive to frost and heat, so you're better off starting the seeds indoors and transplanting them outside when the frost danger has passed.
First off, purchase your seeds from a greenhouse or online. When your seeds arrive, start planting them two to four weeks before the last frost of the spring. Use peat pots because they don't like to be disturbed once planted.
Fill a bowl full of your potting mix and work water through it until it's damp but not soaked. They aren't that picky when it comes to soil, but they do like it slightly warm.
Add your moist soil to your peat pots and gently tamp it down. Don't pack the soil too hard though: your plants should be able to breathe. Fill your peat pots almost to the top lip and poke a hole in the center around two inches (5 cm) deep in the center of each peat pot.
Drop one seed into each hole and backfill it with soil. Water it thoroughly and set it in either a bright south-facing window or four inches (10 cm) under fluorescent lighting. Add a plastic cover over your peat pots to ensure that your soil stays warm and your seeds germinate.
Water your seeds enough to keep the potting soil moist but not saturated. Watch for leaves to push up through the soil. You can move them outdoors once the final frost of the season recedes.
When it comes time to move them outdoors, you'll want to prepare your garden plot. Scout for a place that gets a lot of sun throughout the day. This will ensure that the soil stays warm enough for the plants to grow properly.
Work the soil with a roto-tiller or with a shovel until you have three to four inches (7 to 10 cm) of earth turned up. Add in your potting soil and mix it together thoroughly until you have a nice moisture-retaining mix.
Form mounds for your plants to grow in. You can also plant them on flat ground, but they do best in mounds. Make mounds out of your potting medium up to around twelve inches (31 cm) tall, and make sure that each mound is five to six feet (152 to 183 cm) apart to give them room to sprawl out.
Dig holes in your mounds, so your peat pots are about one inch (3 cm) below the ground. Space each peat pot roughly five to six inches (13 to 15 cm) apart, all around the mound. Add one peat pot per hole, and gently backfill it with soil. Water each mound thoroughly.
The final step before you move onto the growing phase is adding a layer of mulch around each plant. This will protect the plant's roots, and help you combat weeds which would compete for space.
Growing

The hardest part about this vegetable is the planting. Once that's done, they're relatively easy to care for and maintain.
Water your mounds heavily once a week, and make sure you saturate them when you water. Ideally, you want to water in the early morning hours, so they have all day to soak the water in, and they're not soaked overnight. Aim for at least an inch of water at each heavy weekly watering. Water them lightly two to three times between these heavy weekly watering sessions.
Wait for the first blooms to appear. When you see them, it's time to fertilize. They're not picky about their fertilizer, and any well-balanced mix will do fine. After this initial fertilizing, you'll fertilize them every four to six weeks for upkeep.
Harvesting

They are typically ready for harvest sixty days after you've placed them into the ground. Usually, you'll have squash that is ready to harvest around one week from the time you see your first bloom.
Check carefully for any gourds that are "hiding" and blending in with their surroundings. Picking them when they're younger means you'll have a more tender yield.
Cut off of the vine rather than plucking it. This will stop you from damaging the tender plants, and the plant can keep growing. You can store your harvest in the fridge for up to ten days, and you can also can it, so it lasts longer. It will keep up to three months in cool, dry conditions.
Common Problems
Squash Bug
The squash bug will kill your squash by sucking the sap straight out of its leaves. You can prevent them by rotating your crops each year, using an insecticide, and disposing of the squash plants at the end of the season.
Blossom-End Rot
If you have a calcium deficiency in your soil, or if you have uneven moisture levels, the ends may turn black. This makes them inedible, and they'll rot quickly.
Butternut Squash Trivia
Squash is one of the oldest vegetables cultivated, and it's been going on over 10,000 years.
The Native American meaning of squash is ‘eaten raw or uncooked.’
This vegetable will keep up to three months with proper storage.
Australians call it 'Butternut Pumpkin."
Video
Now that you know how to grow Butternut squash, you can add this easy vegetable to your garden roster. It's very easy to incorporate it into a variety of dishes, and it has dozens of health benefits as well.

More Growing Tutorials